1. Getting Started
This guide introduces the basic specifications of the MLSDK using a simple PyTorch program as an example.
1.1. Prerequisites
Please create a workspace by following the instructions in:
Using MN-Core with PyTorch
Next, access JupyterLab and create a new Notebook.
When executing gpfn3-smi within the Notebook, precede the command with ! before running the code cell.
Example of executing gpfn3-smi list in a Jupyter Notebook:
!gpfn3-smi list
If the MN-Core 2 board is properly recognized, you should see output similar to 0: mnc2p28s0.
The leading 0 represents the Device Index, which corresponds to each device sequentially starting from 0.
The substring following the mnc2 prefix (mnc2p28s0) is the Device Name as recognized by the system.
1.2. Directory Structure
When creating a workspace by selecting default from the ClusterWorkspacePreset custom resource,
the directory structure will resemble the following:
/
├── root/                     # Home directory
└── opt/pfn/pfcomp/
    ├── licenses/             # License files
    ├── fx2onnx/              # Common component of MN-Core SDK
    ├── pfvm/                 # Common component of MN-Core SDK
    ├── mncl/                 # HPCSDK (to be released)
    └── codegen/              # Compiler core implementations
        ├── MLSDK/
        │   ├── examples/     # Code examples
        │   ├── src/          # MLSDK interfaces
        │   └── ...
        ├── build/            # Libraries, executable files, and envvar configurations

        ├── preset_options/   # Compiler options for codegen (e.g. O1.json)
        └── python_trainer/   # MLSDK core implementations
Notebooks created via the JupyterLab Launcher are by default stored in /root/.
Note that files required by the MN-Core SDK are located under /opt/pfn/pfcomp/.
In addition to the MLSDK, there is another component that frequently appears in subsequent explanations: codegen. This serves as the compiler and runtime environment specific to the MN-Core series. The architecture works as follows: the MLSDK internally calls the python trainer, which in turn internally invokes codegen’s library components. While this documentation primarily describes the features presented as MLSDK, when discussing the compiler itself, we may use the term “codegen” instead.
1.3. Running Sample Programs
Let’s demonstrate using the MLSDK API with a simple example of adding two vectors.
First, consider a function add that adds two torch.Tensor variables x and y (using the + operator) and prints the result.
1def add(x: torch.Tensor, y: torch.Tensor) -> torch.Tensor:
2    return x + y
When rewritten using the MLSDK API, the resulting program looks like this:
 1import torch
 2from mlsdk import CacheOptions, Context, MNDevice, storage
 3
 4
 5def run_add():
 6    device = MNDevice("mncore2:auto")
 7    context = Context(device)
 8    Context.switch_context(context)
 9
10    def add(input: dict[str, torch.Tensor]) -> dict[str, torch.Tensor]:
11        x = input["x"]
12        y = input["y"]
13        return {"out": x + y}
14
15    sample = {"x": torch.randn(3, 4), "y": torch.randn(3, 4)}
16
17    compiled_add = context.compile(
18        add,
19        sample,
20        storage.path("/tmp/add_two_tensors"),
21        options={"float_dtype": "float"},
22        cache_options=CacheOptions("/tmp/add_two_tensors_cache"),
23    )
24    result = compiled_add({"x": torch.ones(3, 4), "y": torch.ones(3, 4)})
25    result_on_cpu = result["out"].cpu()
26    print(f"{result_on_cpu=}")
27    assert torch.allclose(result_on_cpu, torch.ones(3, 4) * 2)
28
29
30if __name__ == "__main__":
31    run_add()
Before running this program, you must first set the necessary environment variables (LD_PRELOAD and PYTHONPATH).
These configuration files are located in /opt/pfn/pfcomp/codegen/build/ and can be loaded and applied using the source command.
For Notebook users:
!source /opt/pfn/pfcomp/codegen/build/codegen_preloads.sh
!source /opt/pfn/pfcomp/codegen/build/codegen_pythonpath.sh
For Terminal users:
$ source /opt/pfn/pfcomp/codegen/build/codegen_preloads.sh
$ source /opt/pfn/pfcomp/codegen/build/codegen_pythonpath.sh
Now that everything is set up for execution, you can run the add.py program above.
If successful, you should see output similar to the following:
Detailed explanations of each API will be provided in the following sections.
result_on_cpu=tensor([[2., 2., 2., 2.],
        [2., 2., 2., 2.],
        [2., 2., 2., 2.]])
By the way, both environment variable setup and program execution can be handled simultaneously using the /opt/pfn/pfcomp/codegen/examples/exec_with_env.sh script.
Note that since all arguments are passed together to the exec command, you must also specify python3 as part of the arguments.
Also, in the MLSDK environment, the python command is not an alias for python3.X, so be sure to use python3 instead.
Example usage in Terminal:
$ cd /opt/pfn/pfcomp/codegen/examples/
$ ./exec_with_env.sh python3 add.py
1.4. Sample Program Explanation
1.4.1. Device Specification
5def run_add():
6    device = MNDevice("mncore2:auto")
7    context = Context(device)
The mlsdk.MNDevice class is used to specify the target device or alternative execution environment.
When initialized, the device is not locked; locking occurs internally within the mlsdk.CompiledFunction class as described later.
Valid values for arguments include:
“mncore2:” concatenated with either “auto” or a Device Index
mncore2 specifies the use of MN-Core 2 devices, while auto automatically selects any available unlocked device.
While a Device Index can be used instead of auto, device IDs are not supported.
"mncore2:auto", "mncore2:0"
Note
When multiple processes attempt to use the identical device simultaneously, each process will wait for lock acquisition.
If the wait time exceeds a predefined threshold (600 seconds), the process will terminate abnormally as a timeout.
Therefore, we recommend either avoiding duplicate Device Index values or using auto whenever possible.
“emu2”
emu2 refers to an emulator that simulates MN-Core 2 operation.
The emulator runs on the host’s CPU, so Device Index specifications are not applicable.
"emu2"
“pfvm:” concatenated with either “cpu” or “cuda”
PFVM (pfvm) is a component that traces PyTorch programs to construct and optimize computation graphs for execution across various environments.
Supported execution environments include the host’s CPU (cpu) and GPUs (cuda) when available.
Unlike emu2, which runs directly on the CPU, both cpu and cuda execute computations by calling PyTorch’s C++ API, resulting in significantly faster performance.
Regarding cuda, similar to mncore2, Device Index specifications are supported.
"pfvm:cpu", "pfvm:cuda", "pfvm:cuda:0"
Note that when using MN-Core 2, the operation also goes through PFVM (though you cannot specify it as pfvm:mncore2).
For detailed information, please refer to Ecosystem.
1.4.2. Data Synchronization via Context
6    device = MNDevice("mncore2:auto")
7    context = Context(device)
8    Context.switch_context(context)
The mlsdk.Context class associates torch.Tensor objects in the program with tensors on the device, enabling controlled data access from both host and device.
The constructed context maintains a dedicated registry where it can register torch.Tensor objects required for computation.
While the sample program add.py does not demonstrate this, when handling models created using torch.nn.Module through the Context, you would register parameters, buffers (and optionally optimizer state as needed).
Furthermore, by activating the context using mlsdk.Context.switch_context(), the registered torch.Tensor contents become accessible from the device.
Data copying from host to device occurs automatically when needed.
Next, the computation results are output to the device by calling the mlsdk.CompiledFunction (compiled_add) described later.
Since this is available on the host when using MN-Core 2, it returns as a mlsdk.TensorProxy. To treat it as a torch.Tensor, you must explicitly synchronize the computed results by calling the mlsdk.TensorProxy.cpu() method, as shown in the example below.
24    result = compiled_add({"x": torch.ones(3, 4), "y": torch.ones(3, 4)})
25    result_on_cpu = result["out"].cpu()
26    print(f"{result_on_cpu=}")
Note
In this example using "mncore2:auto", the output is returned as a TensorProxy. However, when using "pfvm:cuda" instead, you would receive a direct torch.Tensor.
In either case, calling .cpu() allows you to work with the tensor directly from your Python program, making it device-independent API.
Side Note: Using Multiple Contexts
While no such example exists in the examples/ directory, there are cases where multiple Context objects are created and used interchangeably.
For instance, when performing both model training and inference sequentially, you may want to share torch.Tensor objects within the model but apply different optimizations for inference purposes.
In other words, how tensors corresponding to each torch.Tensor are handled on the device differs between training and inference phases, so creating separate Context objects for each makes switching between them more convenient.
Calling Context.switch_context moves all data associated with the original Context to the host, while loading data corresponding to the newly selected Context onto the device.
1.4.3. Function Compilation
17    compiled_add = context.compile(
18        add,
19        sample,
20        storage.path("/tmp/add_two_tensors"),
21        options={"float_dtype": "float"},
22        cache_options=CacheOptions("/tmp/add_two_tensors_cache"),
23    )
The mlsdk.Context.compile() API takes a target function (add), input sample data (sample), and a destination directory path (storage.path("/tmp/add_two_tensors")) as arguments, and returns a mlsdk.CompiledFunction.
In addition to these three parameters, you can also specify various options and flags. In this example, we specify both standard options (options) and caching options (cache_options).
function=add
10    def add(input: dict[str, torch.Tensor]) -> dict[str, torch.Tensor]:
11        x = input["x"]
12        y = input["y"]
13        return {"out": x + y}
The function to be compiled must conform to the Callcable[[Dict[str, Tensor]], Dict[str, Tensor]] type specification.
The keys in each Dict must correspond to the names of input/output variables in the computation graph, meaning they cannot be omitted, duplicated, or set to empty strings.
If the function references any variables that are not included in the input arguments, those variables will be fixed to their values at compile time.
Therefore, any variables whose values change with each function call must all be included as arguments as torch.Tensor objects.
inputs=sample
In this context, Context.compile serves to convert the function’s processing logic into a static computation graph.
To ensure the dimensions and numeric data types of each torch.Tensor are predetermined, we also provide an sample for reference.
In this example, we use torch.randn to define sample, though the actual values of this sample are not used during compilation.
Therefore, you may also use torch.empty to avoid expensive tensor initialization.
sample = {"x": torch.empty(3, 4), "y": torch.empty(3, 4)}
It’s also acceptable to use the same values as both the sample and input for compiled_add.
While add.py demonstrates cases where the sample and input torch.Tensor values differ, as shown below, you can use identical values as well.
sample = {"x": torch.ones(3, 4), "y": torch.ones(3, 4)}
...
result = compiled_add(sample)
codegen_dir=storage.path(“/tmp/add_two_tensors”)
This specifies the directory (called codegen_dir) path where the compiled results will be saved.
Since mlsdk.storage.path() returns a pathlib.Path object, you can directly specify the directory path as an argument.
After executing the processing in add.py once, you can verify the contents of /tmp/add_two_tensors.
Files ending with .zst are compressed using the Zstandard format.
Note
The content may vary depending on the MLSDK version and the target for compilation.
options={“float_dtype”: “float”}
Compilation options that specify compiler behavior, expected to be a Dict[str, str] type.
This example specifies float_dtype, which instructs the compiler to use float when handling torch.Tensor objects with initial torch.float32 dtype on MN-Core 2.
In addition to float, other valid values for float_dtype include double, mixed, and half. The default value when not specified is mixed.
For detailed information about mixed, please refer to the options description in mlsdk.Context.compile().
For detailed information about compilation options, see Compile Options.
cache_options={“/tmp/add_two_tensors_cache”}
Takes mlsdk.CacheOptions as an argument to specify how to save and reuse compilation results.
This example only specifies the destination directory (/tmp/add_two_tensors_cache), but can also specify whether to save GPFNApp, ONNX, or codegen cache.
GPFNApp
model.app (or model.app.zst) located in /tmp/add_two_tensors is a GPFNApp - a file containing assembly code for MN-Core 2 along with additional execution information.
You can inspect the contents of a GPFNApp using the dump_gpfnapp tool.
$ /opt/pfn/pfcomp/codegen/build/integration/dump_gpfnapp /tmp/add_two_tensors/model.app
target_name: GPFN3
inputs:
  x: DRAM@0-16/Float(3,4 PadLayout{(3,4)/((3:1), (1:1, 2_W:1, 4_PE:1); B@[MAB,L1B,L2B])} alias_base=null torch_dtype=Float layout_kind=MNCore)
  y: DRAM@16-32/Float(3,4 PadLayout{(3,4)/((3:1), (1:1, 2_W:1, 4_PE:1); B@[MAB,L1B,L2B])} alias_base=null torch_dtype=Float layout_kind=MNCore)
outputs:
  out: DRAM@32-48/Float(3,4 PadLayout{(3,4)/((3:1), (1:1, 2_W:1, 4_PE:1); B@[MAB,L1B,L2B])} Dirty alias_base=null torch_dtype=Float layout_kind=MNCore)
...
From this information, you can verify:
The memory addresses on the device DRAM where the data corresponding to
x,y, andoutare located (e.g.DRAM@0-16)Their data types (e.g.
/Float)How they are mapped to Local Memory (e.g.
PadLayout{(3,4)/((3:1), (1:1, 2_W:1, 4_PE:1); B@[MAB,L1B,L2B]))
ONNX
model.onnx (or model.onnx.zst) located in /tmp/add_two_tensors outputs the computation graph for the add function in the ONNX format.
Visualization of model.onnx using the Codegen Dashboard feature is shown in Fig. 1.1.
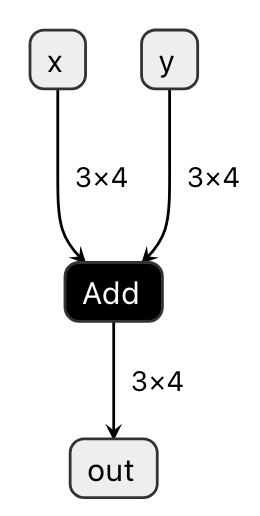
Fig. 1.1 Visualizing model.onnx
The ONNX Add operator can be seen as taking x and y as inputs and producing out as output.
While this example demonstrates a very simple case, visualizing more complex functions can be particularly useful for debugging purposes.
codegen cache
This represents intermediate compilation artifacts, configured when performing advanced optimizations. It contains two types of data:
schedule: Output from the Scheduler that determines the order of data movement and computation kernel execution within the devicesimulation_result: Output from the Node Simulation that estimates memory usage and execution time for each computation kernel
1.4.4. Call CompiledFunction
24    result = compiled_add({"x": torch.ones(3, 4), "y": torch.ones(3, 4)})
25    result_on_cpu = result["out"].cpu()
The mlsdk.CompiledFunction object (compiled_add) obtained through Context.compile accepts inputs identical to those provided during compilation and returns an output consisting of one or more mlsdk.TensorLike objects.
The TensorLike definition is Union[torch.Tensor, TensorProxy], meaning that by restricting calls to common APIs like .cpu(), they can be treated identically in Python programs regardless of their underlying implementation.
The input type is Dict[str, TensorLike], which shares similarities with the Dict[str, Tensor] received during compilation, with some minor differences.
The key requirements for matching between inputs and samples are the dimensions and numeric types of each key’s corresponding Tensor or TensorProxy.
However, for TensorProxy objects, the information of the corresponding Tensor within the same Context is referenced.
If a key corresponding to an input name is missing in the calculation graph or if the information of the corresponding Tensor differs, the following message will be displayed and the program will terminate:
AssertionError: y is not in inputs.
terminate called after throwing an instance of 'std::runtime_error'
what():  shape '[3, 4]' is invalid for input of size 9
Additionally, TensorProxy objects that can be used as inputs may include outputs from other mlsdk.CompiledFunction() objects or can be obtained using mlsdk.CompiledFunction.allocate_input_proxy().
For details, refer to Data Transfer via TensorProxy.
The output type is also Dict[str, TensorLike], and as mentioned earlier, it can be treated as a torch.Tensor by calling .cpu() on it.
Important note: When synchronizing output data, not only is the data copied from the device to host, but execution waits until the compiled_add operation is complete.
This occurs because device-side operations are performed asynchronously, and to confirm completion of the compiled_add operation, you must either wait for .cpu() or mlsdk.Context.synchronize() to complete.
Note
The synchronize operation updates all registered torch.Tensor objects and involves significant data copying.
Therefore, for performance considerations, we recommend using .cpu() judiciously as needed.
When a CompiledFunction is called, it first calls Context.switch_context to switch itself to the Context it is registered with.
If the same Context is already in use, no action is taken, but when using multiple Context objects, this can cause unintended performance degradation, so caution is required.
Next, the computation executes asynchronously, during which it locks the device specified by MNDevice.
Therefore, as long as sufficient resources (such as memory or the device itself) are available, multiple calls to different CompiledFunction instances can be made without waiting for previous executions to synchronize and complete.
However, if multiple operations with the same Device Index are queued for execution, those operations will be serialized.
1.5. Advanced Topics
MLSDK provides multiple APIs for training and inference of machine learning models, with more advanced examples explained in Machine Learning Tutorial.